◆ Altar
Docs
Installation Sacred
Tools
Sender Viewer Extractor
Dev / Sysadmin
Deploy Manage Users Backup/Transfer
GitHub
◆ Altar
GitHub

AltarViewer

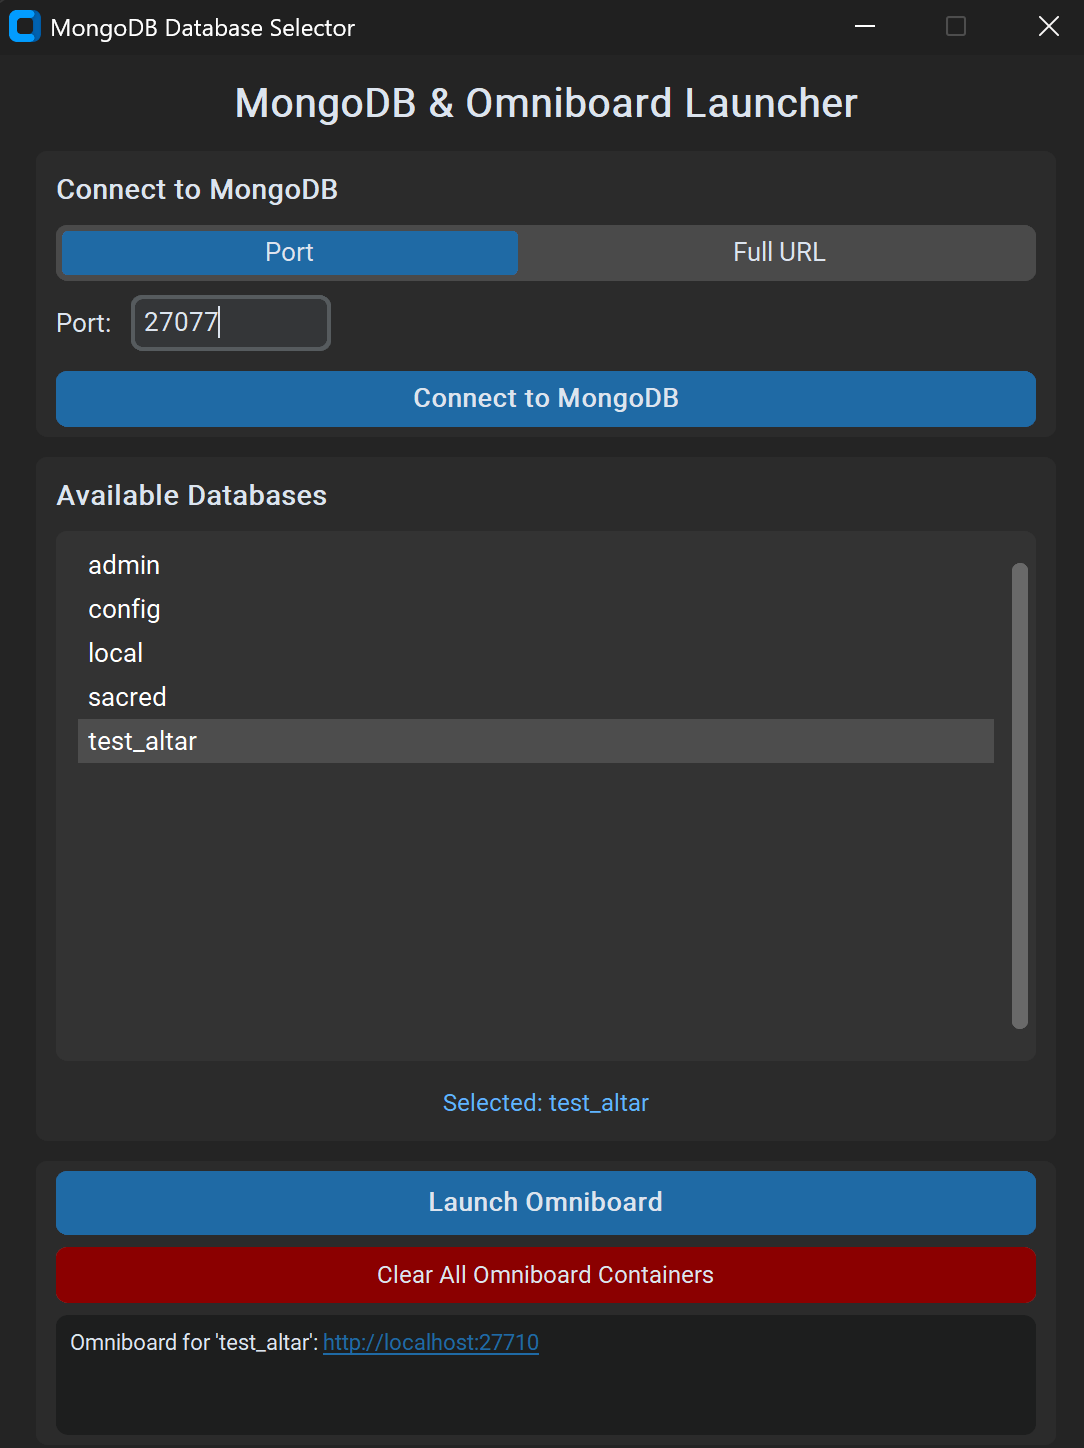
Web app to connect to your MongoDB experiments and open Omniboard in one click.

Quick start Download Release View source

Features

Visualize Sacred databases online

Open your Sacred experiment databases in Omniboard via a simple web interface.

What you need

Docker Desktop Install Docker Desktop and ensure it is running.
MongoDB Compass Install MongoDB Compass to inspect and test connections to your MongoDB instance.
Sacred-formatted data Your experiments should be logged using the Sacred format so Omniboard and AltarViewer can read them.

Quick start

1

Install option 1 — Executable

Download the latest platform-specific launcher from Altar Releases and run it.

2

Run from source — Python app

cd AltarViewer
python -m venv venv
venv\Scripts\activate      # Windows
# source venv/bin/activate  # macOS/Linux
pip install -r requirements.txt
python -m src.main

From the monorepo, open the AltarViewer folder and run the Python application in a virtual environment.

3

Start Docker

# Windows: Launch Docker Desktop and wait until it's ready
# Tip: look for the green/Ready status in the tray

# Linux (Docker Engine):
sudo systemctl start docker

# Linux (Docker Desktop):
systemctl --user start docker-desktop

# Verify Docker is available:
docker version

Ensure Docker is running before launching Omniboard. If Docker isn't ready, the launch will fail.

4

Connect to MongoDB

Choose between connecting by port (default: 27017), by full MongoDB URL or by credentials, then click Connect to list databases.

5

Launch Omniboard

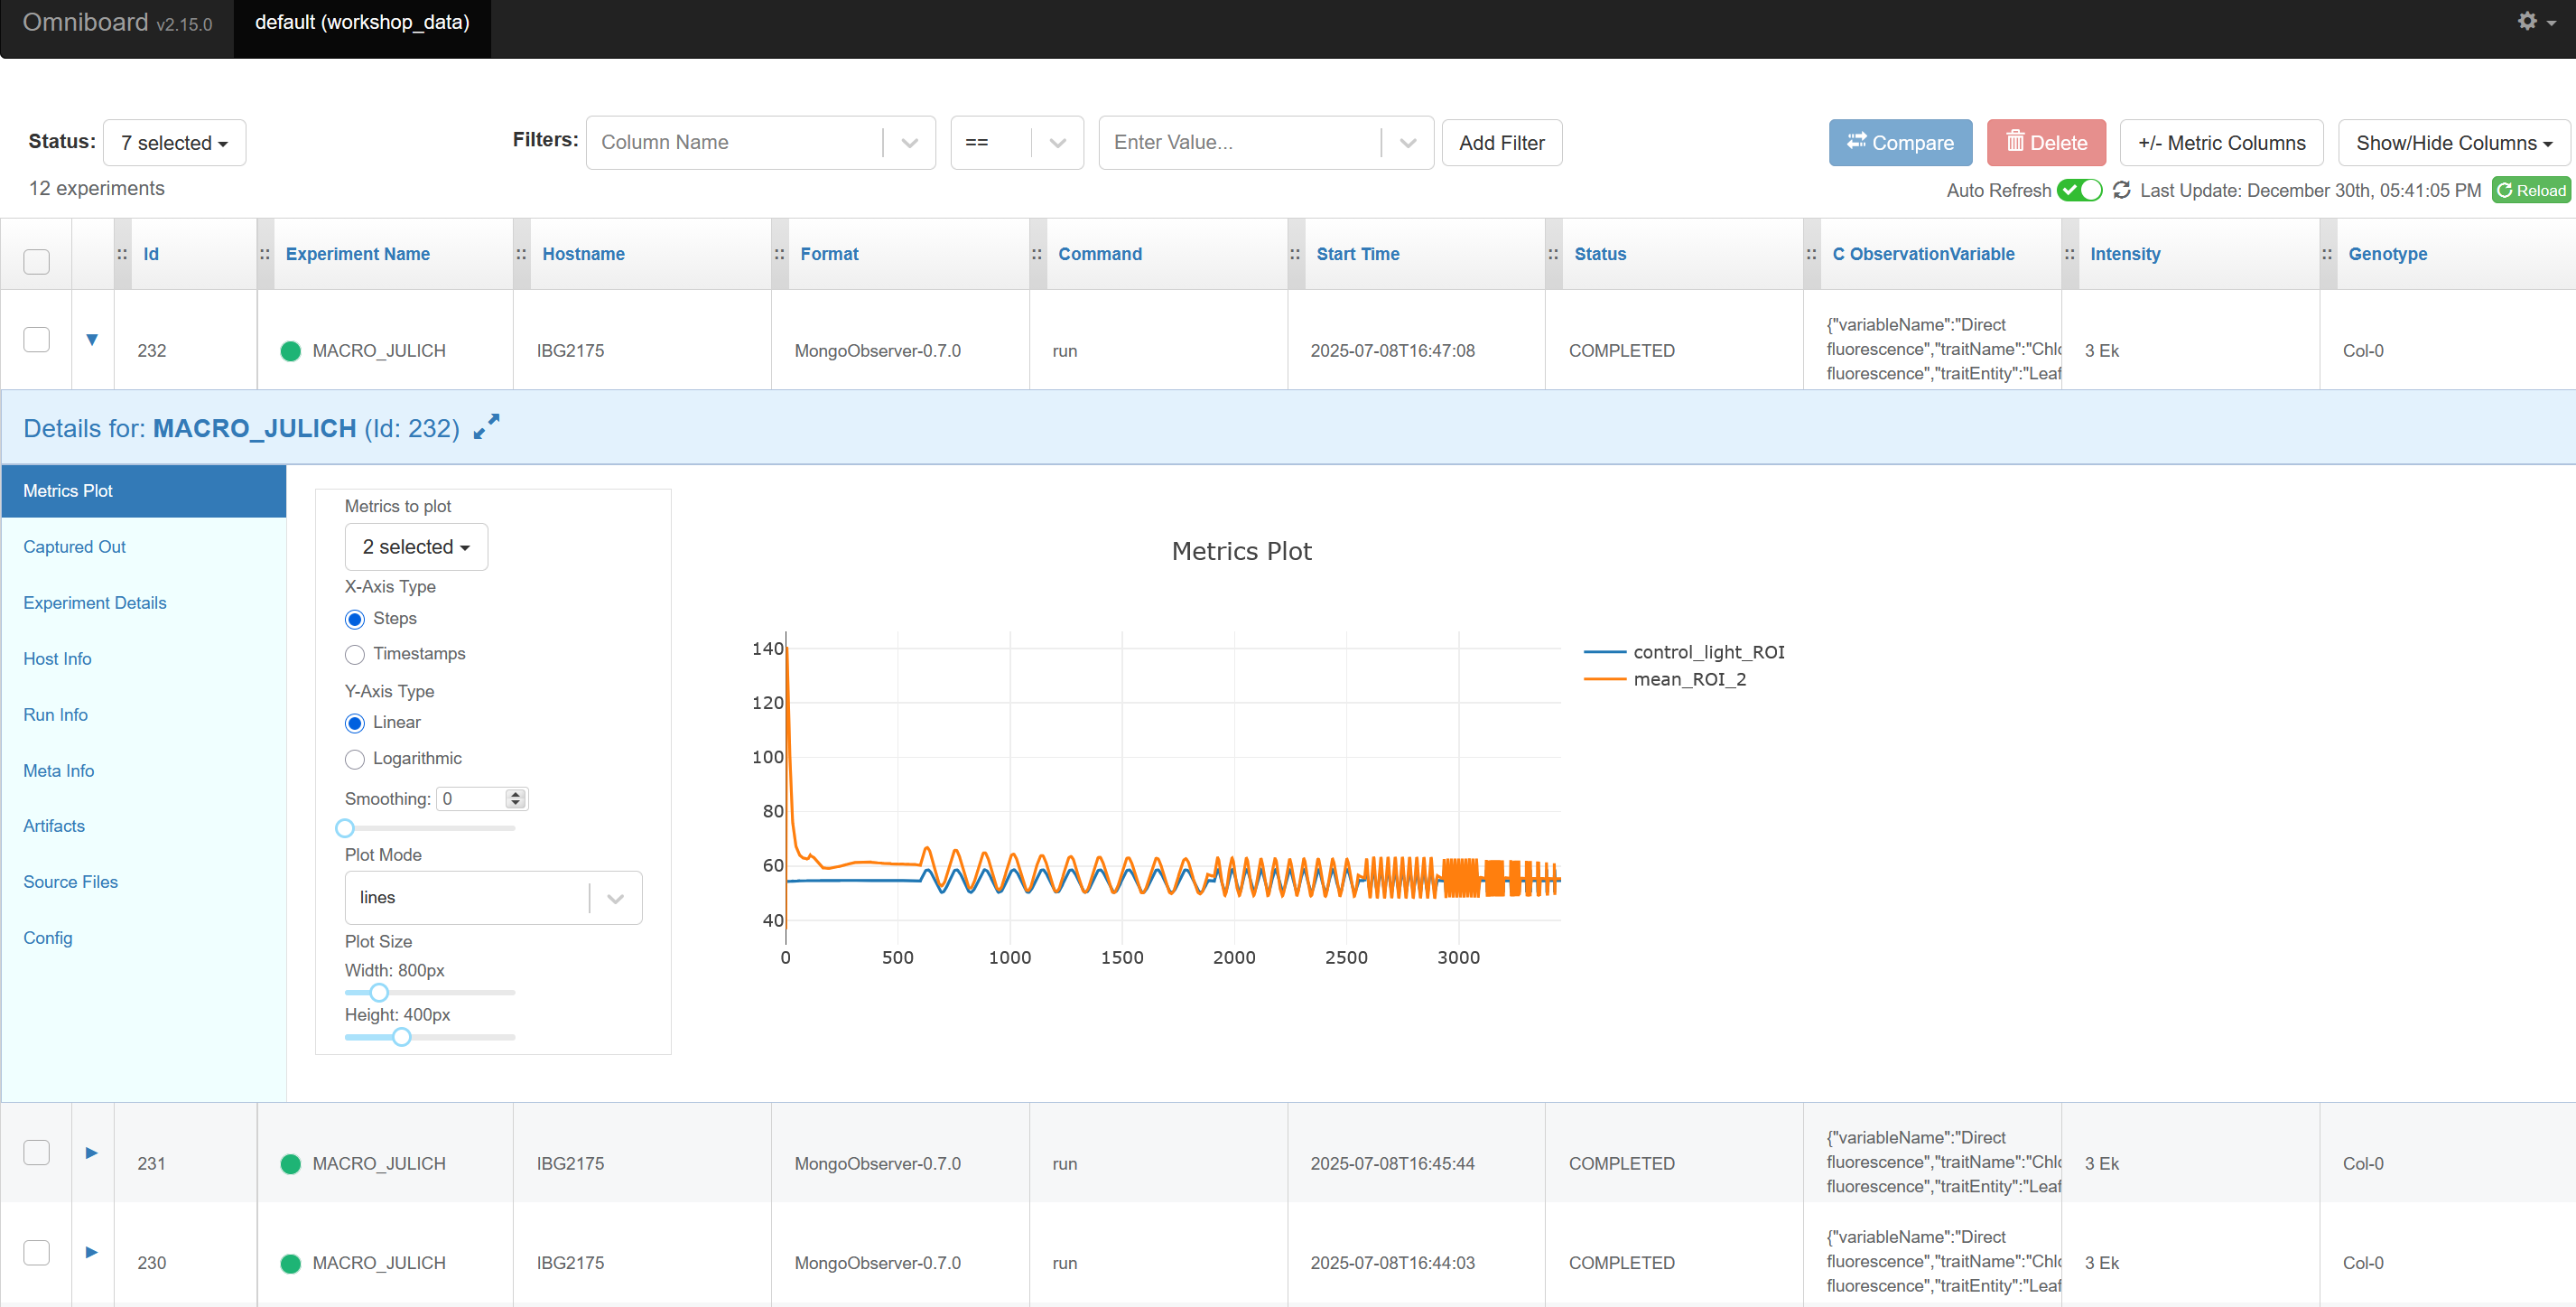
Select a database and click Launch Omniboard. Open Omniboard using the links shown in the AltarViewer UI.

Related tools

AltarDocker

Deploy MongoDB, MinIO, Omniboard, and AltarExtractor with Docker Compose.

Learn more →

AltarExtractor

Browse and filter Sacred experiments with a modern web UI.

Learn more →

AltarSender

Send experiments to Sacred and artifacts to MinIO.

Learn more →

Full Documentation

AltarViewer

Python Version License

Note: AltarViewer is part of the Altar monorepo. You can either download a prebuilt executable from the monorepo releases or build and run from source.

A graphical user interface application for launching and managing Omniboard instances to visualize and track MongoDB-backed experiments from the DREAM/Altar ecosystem.

Table of Contents

  • Features
  • Installation
    • Prerequisites
    • From Source
  • Usage
    • Quick Start
    • Configuration
  • Development
    • Setting Up Development Environment
    • Running Tests
    • Building the Executable
  • Architecture
  • Contributing
  • Troubleshooting
  • Versioning
  • License

Features

  • MongoDB Connection Management: Connect to local, remote, or Atlas MongoDB instances (port or full URI)
  • Database Discovery: Automatically list available databases
  • One-Click Omniboard Launch: Deploy Omniboard in isolated Docker containers
  • Web UI: Dash-based web application served in your browser
  • Docker Integration: Automatic container management and cleanup
  • Multi-Instance Support: Run multiple Omniboard instances on different ports
  • Deterministic Port Assignment: Hash-based port generation preserves browser cookies per database
  • Container Cleanup: Easy removal of all Omniboard containers

Installation

You can use any of these options:

From Binary Release

Prebuilt executables for Windows, macOS, and Linux are attached to the monorepo’s Releases.

1) Download

  • Go to the monorepo Releases page
  • Under the latest release, download the Viewer asset for your OS/architecture

2) Run

  • Windows (PowerShell):
     .\AltarViewer.exe
    
  • macOS/Linux (Terminal):
     chmod +x ./AltarViewer
     ./AltarViewer
    

3) Optional CLI usage

  • You can also run the executable from a terminal to capture logs.

From Source

git clone https://github.com/DreamRepo/Altar.git
cd Altar/AltarViewer
python -m venv venv

# Activate the venv (one of these)
venv\Scripts\activate      # Windows
source venv/bin/activate    # macOS/Linux

pip install -r requirements.txt
python -m src.main

Usage

Quick Start

  1. Start docker desktop
    • For windows: launch docker desktop executable.
  • For Linux: systemctl --user start docker-desktop
  1. Launch the application (using any install option above)

  2. Connect to MongoDB
    • Choose a connection mode:
      • Port: enter your MongoDB port (default: 27017 for localhost)
      • Full URI: paste a full MongoDB connection URI (works with Atlas, remote VMs, authentication, TLS and options)
        • Security note: do not paste passwords here. Prefer the “Credential URI” tab to avoid storing secrets in plain text.
      • Credential URI: paste a credential-less URI (e.g., mongodb://host:27017/yourdb) and enter username/password/auth_source separately from the following schemes: mongodb+srv://user:pass@my-cluster.mongodb.net/?retryWrites=true&w=majority, mongodb://username:password@host:27017/?authsource=db_name
        • Optionally save your password securely using the OS keyring
    • Click “Connect” to list available databases
  3. Select a database
    • Choose a database from the dropdown list
    • Click “Launch Omniboard”
  4. Access Omniboard
    • A clickable link will appear in the interface
    • Omniboard opens automatically in your default browser

Configuration

MongoDB Connection

  • Connection Modes:
    • Port: quick local development; launches Omniboard with -m host:port:database
      • If you connect to localhost or 127.0.0.1, the app maps it so the Docker container can reach your host MongoDB:
        • Windows/macOS: host.docker.internal
        • Linux: 172.17.0.1 (Docker bridge gateway)
    • Full URI: recommended for Atlas/remote; launches Omniboard with --mu <uri-with-db>
      • The selected database is injected into the URI path before launching Omniboard, while preserving credentials and query parameters.
      • Example constructed argument:
        • --mu "mongodb+srv://user:pass@MONGO_IP/DB_NAME?authsource=DB_NAME"
      • For security, the app does not persist Full URI values between sessions.
    • Credential URI: enter a credential-less URI and provide username/password separately
      • Passwords are stored only in the OS keyring if you opt in; they are never written to disk
  • Default Port: 27017
  • Authentication: Supply credentials in your URI for Full URI mode

Port Management

  • Deterministic Port Assignment: Ports are generated using a hash of the database name (base: 20000, range: 10000)
  • Browser Cookie Preservation: The same database always gets the same port, preserving Omniboard customizations and cookies in your browser
  • Automatic Conflict Resolution: If the preferred port is unavailable, the next free port is automatically selected
  • Port Range: 20000-29999 (based on SHA-256 hash of database name)

Development

Setting Up Development Environment

  1. Clone and setup
    git clone https://github.com/DreamRepo/Altar.git
    cd Altar/AltarViewer
    python -m venv venv
    source venv/bin/activate  # or venv\Scripts\activate on Windows
    
  2. Install development dependencies
    pip install -r requirements.txt
    pip install -r requirements-dev.txt
    

Running Tests

# Run all tests
pytest

# Run with coverage
pytest --cov=src --cov-report=html

# Run specific test file
pytest tests/test_mongodb.py

# Run with verbose output
pytest -v

Building the Executable

Build a standalone executable using PyInstaller:

# Install PyInstaller (if not in requirements-dev.txt)
pip install pyinstaller

# Build executable
pyinstaller AltarViewer.spec

# Output will be in dist/ directory

Customizing the Build

Edit AltarViewer.spec to customize:

  • Application name and icon
  • Bundled data files
  • Hidden imports
  • Build options

Architecture

AltarViewer/
├── src/
│   ├── main.py          # Application entry point
│   ├── gui.py           # GUI implementation (CustomTkinter)
│   ├── mongodb.py       # MongoDB connection logic
│   ├── omniboard.py     # Docker/Omniboard management
│   └── prefs.py         # Secure preferences (JSON + OS keyring)
├── tests/
│   ├── conftest.py      # Pytest configuration
│   ├── test_mongodb.py  # MongoDB tests
│   └── test_omniboard.py # Omniboard tests
├── assets/              # Images and resources
├── requirements.txt     # Production dependencies
├── requirements-dev.txt # Development dependencies
└── AltarViewer.spec # PyInstaller specification

Key Components

  • GUI Layer (gui.py): CustomTkinter-based interface
  • MongoDB Layer (mongodb.py): Database connection and queries
  • Omniboard Layer (omniboard.py): Docker container management with hash-based port assignment
  • Main Controller (main.py): Application orchestration

Port Assignment Algorithm

The application uses a deterministic hash-based port assignment:

port = 20000 + (SHA256(database_name) % 10000)

This ensures:

  • Consistency: Same database → same port
  • Browser Persistence: Cookies and customizations are preserved
  • Conflict Handling: Automatic fallback to next available port if needed

Contributing

We welcome contributions! Please follow these guidelines:

Getting Started

  1. Fork the repository on GitHub
  2. Clone your fork locally
    git clone https://github.com/YOUR_USERNAME/Altar.git
    cd Altar/AltarViewer
    
  3. Create a feature branch
    git checkout -b feature/your-feature-name
    

Development Workflow

  1. Make your changes
    • Follow PEP 8 style guidelines
    • Add tests for new features
    • Update documentation as needed
  2. Run tests and linting
    pytest
    
  3. Commit your changes
    git add .
    git commit -m "feat: add your feature description"
    

    Use Conventional Commits:

    • feat: New feature
    • fix: Bug fix
    • docs: Documentation changes
    • test: Test additions or changes
    • refactor: Code refactoring
    • chore: Maintenance tasks
  4. Push to your fork
    git push origin feature/your-feature-name
    
  5. Create a Pull Request
    • Provide a clear description of changes
    • Reference any related issues
    • Ensure all tests pass

Troubleshooting

Connection Errors

Problem: “Connection Error” when connecting to MongoDB

Solutions:

  • Ensure MongoDB is running: mongosh or mongo
  • Check the port number (default: 27017)
  • Verify firewall settings allow connections
  • Check MongoDB logs for authentication issues

Docker Issues

Problem: Docker-related errors when launching Omniboard

Solutions:

  • Verify Docker Desktop is running: docker ps
  • Check Docker has sufficient resources allocated
  • Ensure port 9005+ are not in use by other applications
  • Try clearing old containers: Use the cleanup button in the app
  • If using the packaged EXE, ensure the Docker CLI is on PATH or installed in the default location. The app resolves common Docker paths but may fail if the CLI is missing.
  • On slower machines, Docker initialization can take >30s after launch; the app now waits up to 60s, but if you still see “Docker not running”, retry once Docker is fully ready.
  • The app does not auto-start Docker on any OS. Please start Docker Desktop (or the Docker service) manually, wait for it to be ready, and then launch Omniboard.

Note: In Port mode, the app automatically maps localhost/127.0.0.1 so containers can reach MongoDB running on the host:

  • Windows/macOS: host.docker.internal
  • Linux: 172.17.0.1

Omniboard stuck on “Loading app…”

Common causes:

  • The connection string used inside the container is missing the selected database
  • localhost from the host OS is unreachable from inside Docker (Windows/macOS)
  • Authentication failure or insufficient permissions on the selected database

What the app does:

  • In Full URI mode, it injects the selected database into the URI and uses --mu, preserving credentials/options

What to check:

  • Validate your URI with mongosh and ensure it has read access to the selected DB
  • Confirm the container is running, or use the cleanup button and relaunch
  • Give the container a few seconds after launch to initialize

Database list shows only one entry

Some deployments (e.g., MongoDB Atlas or non-admin users) do not allow the listDatabases command. In that case, the app falls back to the database present in your connection URI so you can still launch Omniboard for it.

Port Conflicts

Problem: “Port already in use” errors

Solutions:

  • The application automatically finds the next available port if the preferred port is busy
  • Use the “Clear Omniboard Docker Containers” button to remove old containers
  • Manually check and stop containers:
    docker ps
    docker stop <container_id>
    
  • Check for other applications using ports 20000-29999

Note: Each database consistently uses the same port (hash-based), allowing your browser to remember Omniboard customizations and preferences per database

Import Errors

Problem: Missing module errors when running from source

Solutions:

  • Reinstall dependencies: pip install -r requirements.txt
  • Ensure virtual environment is activated
  • Check Python version compatibility (3.8+)

Keyring not available or password not remembered

If the “Save password securely” option is disabled or your password does not reappear:

  • Ensure the keyring package is installed in your environment: pip install keyring
  • On Linux, ensure you have a supported keyring backend (e.g., gnome-keyring/Secret Service or KWallet) and a running session
  • The app never writes passwords to disk; they are stored only in the OS keychain when this option is enabled

Preferences file shows up when building/running from repo

Older versions saved preferences at ~/.altarviewer_config.json, which could be affected if the HOME environment variable was overridden (e.g., by certain shells/tools) while running inside a repository folder. The app now stores preferences in the standard OS config location (e.g., %APPDATA%\AltarViewer\config.json on Windows) using platformdirs, so it no longer depends on the current working directory or HOME. Existing legacy configs are read for compatibility but new saves go to the stable location.

Getting Help

  • Check existing GitHub Issues
  • Review Omniboard documentation
  • Contact the DREAM/Altar team

Versioning

This component is part of the Altar monorepo. Releases are published on the monorepo. You can either download the compiled binaries or build from source.

License

This project is licensed under the GNU General Public License v3.0 - see the LICENSE file for details.

← Back to Altar
Source · License (GPL‑3.0)