AltarViewer
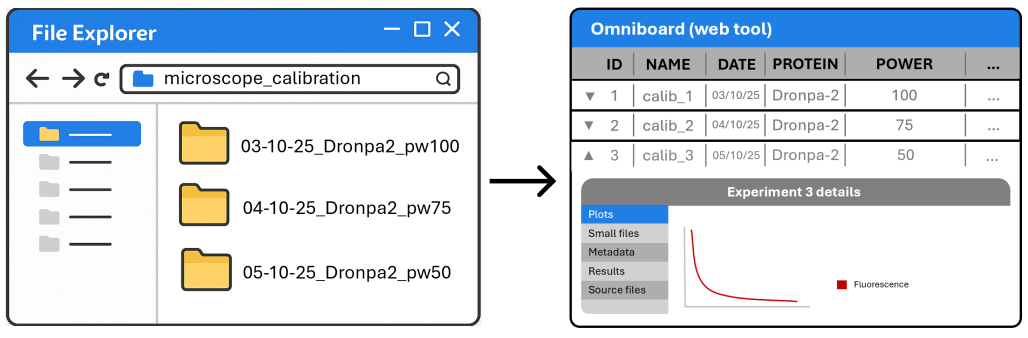
Launch Omniboard and explore your uploaded experiments.
A desktop GUI to map experiment folders and send runs to MongoDB in a Sacred‑compatible format. Artifacts to MinIO (optional) or local storage.
Select folders and map files to Sacred‑compatible data types: config, results, metrics, artifacts.
Store experiment metadata, configs, results, and metrics in MongoDB using the Sacred schema (works with Omniboard).
Optionally upload large raw data files to S3‑compatible MinIO storage; otherwise keep them on local/network storage.
Send multiple experiments with the same folder structure in one go.
Supports JSON, CSV, and Excel files for configs, results, and metrics.
Automatically extract parameters from filenames and folder names (e.g., subject=S01, cond=stimA) and inject them into the experiment config.
Optionally save raw data to local or network paths instead of MinIO.
# Windows
.\AltarSender.exe

# macOS/Linux
chmod +x ./AltarSender
./AltarSender
Download the latest platform-specific executable from Altar Releases and run it.
cd AltarSender
python -m venv .venv
.venv\Scripts\activate  # Windows
# source .venv/bin/activate  # Linux/macOS
pip install -r requirements.txt
python app.pyThe GUI window will open.
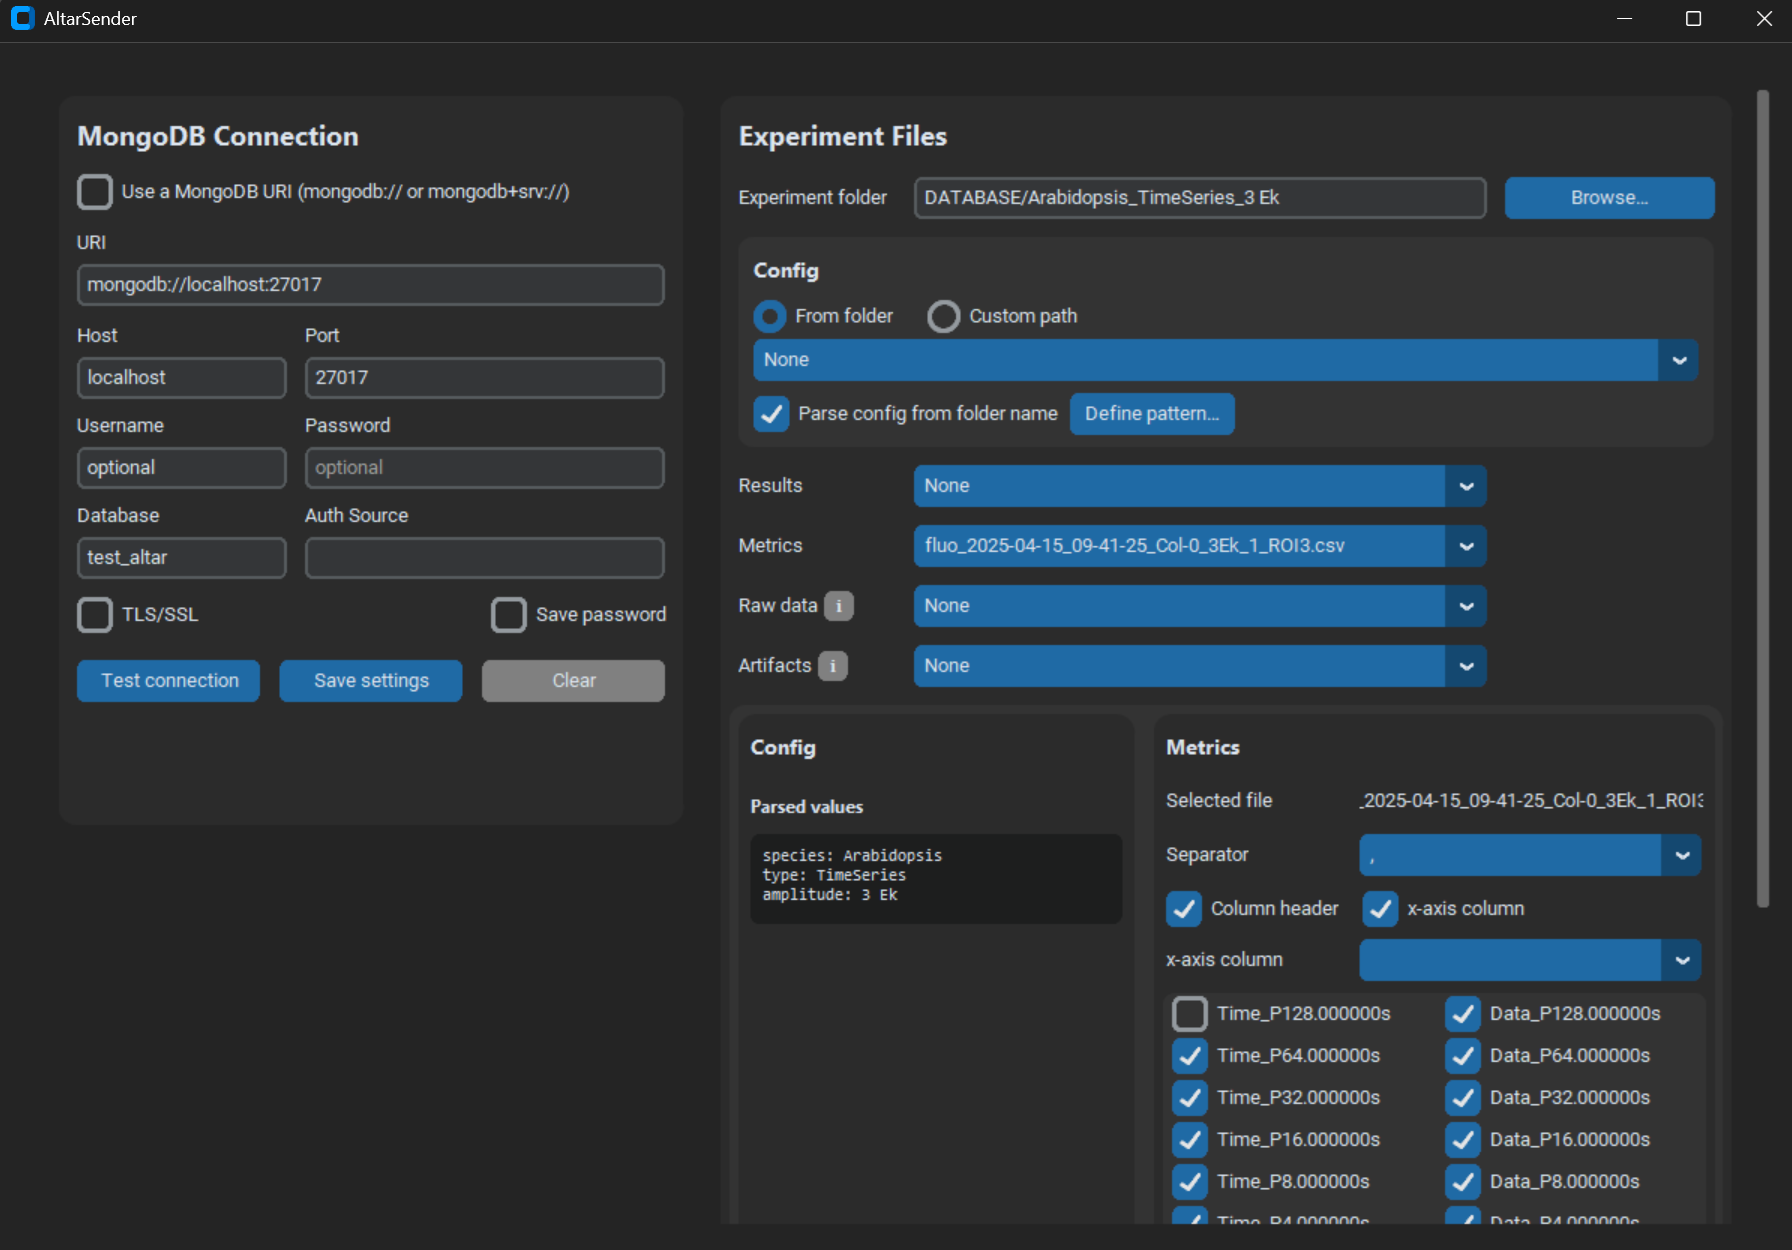
Enter your MongoDB credentials. Optionally configure MinIO for large file storage.
Choose an experiment folder, map files to data types, and click Send experiment.
Send multiple experiments at once when they share the same folder structure. Configure one experiment, enable batch mode, and all sibling folders will be processed.
Parent folder/
├── 2023-04-17_Experiment1/
│   ├── config.json
│   ├── results.csv
│   └── raw_data/
│       └── video.tiff
│
└── 2023-04-17_Experiment2/
    ├── config.json
    ├── results.csv
    └── raw_data/
        └── video.tiff
Launch Omniboard and explore your uploaded experiments.
Browse and filter Sacred experiments with a modern web UI.
Note: AltarSender is part of the Altar monorepo. You can either download a prebuilt executable from the monorepo releases or build and run from source.
A graphical user interface (GUI) built with Python and CustomTkinter to send experiment results to a MongoDB Sacred database. Optionally upload heavy files to MinIO or a local/network file path.
The simplest mapping to help you fill the app:
| Field | What it means | Accepted formats |
|---|---|---|
| Config | Experimental parameters | JSON, CSV, Excel, YAML, or extraction from folder name |
| Metrics | XY data points | CSV, Excel |
| Artifacts | Small files (approx. <25 MB) | Any file (PNG, JPG, CSV, PDF, etc.) |
| Raw data | Large files (approx. >25 MB) | Any file (PNG, JPG, CSV, PDF, etc.) |
| Results | Performance numbers | JSON, CSV, Excel |
Tip: MongoDB stores your metadata (config, results, metrics), while MinIO or your filesystem stores the large raw files.
Deployment instructions: See Altar Docs for setting up MongoDB and MinIO.
 git clone https://github.com/DreamRepo/Altar.git
 cd Altar/AltarSender
python -m venv .venv
Windows:
.venv\Scripts\activate
Linux/macOS:
source .venv/bin/activate
pip install -r requirements.txt
Prebuilt executables for Windows, macOS, and Linux are attached to the monorepo’s Releases.
1) Download
2) Run
.\AltarSender.exe
  chmod +x ./AltarSender
  ./AltarSender
python app.py
If you see ModuleNotFoundError: No module named 'XXXX', run:
pip install XXXX
The app window should open.
Enter your database credentials in the app. Use the Test Connection button to verify connectivity.
If uploading raw data to MinIO, enter your MinIO credentials (endpoint, access key, secret key, bucket name).
Each experiment should have its own folder. The folder name becomes the experiment name.
The experiment configuration (name, conditions, instrument settings, etc.).
Supported formats: JSON, CSV, Excel
JSON example:
{
    "experiment": {
        "name": "Experiment1",
        "duration": {
            "time": 3200,
            "unit": "seconds"
        }
    }
}
With “Flatten JSON” enabled, this becomes:
{
    "experiment_name": "Experiment1",
    "experiment_duration_time": 3200,
    "experiment_duration_unit": "seconds"
}
CSV/Excel format (no header, key-value pairs):
| param1 | value1 |
|---|---|
| param2 | value2 |
| param3 | value3 |
Experiment result values. Same format as Config (JSON, CSV, or Excel).
Time series data for plotting. Supported formats: CSV, Excel.
Large files to upload to MinIO or a filesystem path.
Naming convention:
video.tiff → video/[hash]_[datetime]_video.tiff (if folder name contains datetime)video.tiff → video/[hash]_video.tiff (otherwise)The hash is generated from the experiment folder name (7 alphanumeric characters).
Small files (< 50MB) stored directly in MongoDB. Same organization as raw data. These files can be accessed directly from Omniboard.
Warning: Storing large artifacts impacts database performance.
For experiments with identical folder structures:
Example structure:
Parent folder/
├── 2023-04-17_18_13_Experiment1/
│   ├── config.json
│   ├── results.csv
│   ├── metrics.xlsx
│   ├── capture.png
│   └── raw_data/
│       ├── frames.tiff
│       └── video.mp4
│
└── 2023-04-17_18_18_Experiment2/
    ├── config.json
    ├── results.csv
    ├── metrics.xlsx
    ├── capture.png
    └── raw_data/
        ├── frames.tiff
        └── video.mp4
Configure Experiment1, enable batch mode, and both experiments will be sent.
Access your experiments in Omniboard:
| Data type | Location in Omniboard |
|---|---|
| Config | Config (last menu item) |
| Results | Run Info → root → result |
| Metrics | Metrics plot |
| Artifacts | Artifacts |
| Raw data | Run Info → dataFiles (paths) |
You can build a standalone executable that doesn’t require Python to be installed. The executable will include all dependencies.
Ensure you have the development environment set up:
# Create and activate virtual environment
python -m venv .venv

# Windows
.venv\Scripts\activate

# Linux/macOS
source .venv/bin/activate

# Install dependencies
pip install -r requirements.txt
pip install pyinstaller
# Option 1: Use the build script (recommended)
python build_exe.py

# Option 2: Use PyInstaller directly with the spec file
pyinstaller AltarSender.spec

# Option 3: Build manually
pyinstaller --name=AltarSender --onefile --windowed --noconfirm ^
    --add-data=".venv\Lib\site-packages\customtkinter;customtkinter" ^
    --hidden-import=customtkinter --hidden-import=sacred ^
    --hidden-import=sacred.observers --hidden-import=pymongo ^
    --hidden-import=pandas --hidden-import=numpy --hidden-import=openpyxl ^
    --hidden-import=boto3 --hidden-import=botocore ^
    --collect-all=customtkinter --collect-all=sacred ^
    app.py
The executable will be in the dist/ folder: dist/AltarSender.exe
# Option 1: Use the build script (recommended)
python build_exe.py

# Option 2: Use PyInstaller directly with the spec file
pyinstaller AltarSender.spec

# Option 3: Build manually
pyinstaller --name=AltarSender --onefile --windowed --noconfirm \
    --add-data=".venv/lib/python3.*/site-packages/customtkinter:customtkinter" \
    --hidden-import=customtkinter --hidden-import=sacred \
    --hidden-import=sacred.observers --hidden-import=pymongo \
    --hidden-import=pandas --hidden-import=numpy --hidden-import=openpyxl \
    --hidden-import=boto3 --hidden-import=botocore \
    --collect-all=customtkinter --collect-all=sacred \
    app.py
The executable will be in the dist/ folder: dist/AltarSender
Make it executable if needed:
chmod +x dist/AltarSender
# Option 1: Use the build script (recommended)
python build_exe.py

# Option 2: Use PyInstaller directly with the spec file
pyinstaller AltarSender.spec

# Option 3: Build manually
pyinstaller --name=AltarSender --onefile --windowed --noconfirm \
    --add-data=".venv/lib/python3.*/site-packages/customtkinter:customtkinter" \
    --hidden-import=customtkinter --hidden-import=sacred \
    --hidden-import=sacred.observers --hidden-import=pymongo \
    --hidden-import=pandas --hidden-import=numpy --hidden-import=openpyxl \
    --hidden-import=boto3 --hidden-import=botocore \
    --collect-all=customtkinter --collect-all=sacred \
    app.py
The executable will be in the dist/ folder: dist/AltarSender.app (or dist/AltarSender binary)
Note: On macOS, you may need to right-click and select “Open” the first time to bypass Gatekeeper, or run
xattr -cr dist/AltarSender.appto remove quarantine attributes.
| Platform | Output Location | Output Name |
|---|---|---|
| Windows | dist/ |
AltarSender.exe |
| Linux | dist/ |
AltarSender |
| macOS | dist/ |
AltarSender.app or AltarSender |
--hidden-import flag--add-data to include necessary filesThis monorepo may include a GitHub Actions workflow to build executables for Windows, Linux, and macOS.
Note: On Linux/macOS, you may need to make the file executable:
chmod +x AltarSender-Linux # or AltarSender-macOS
Releases for individual components may be consolidated at the monorepo level. Prefer building from source using the instructions above.
You can also manually trigger a build: